A few days ago, I asked in the Etsy forums for the best sewing tips from those who sew. The response was tremendous!! Whether you are a beginner or a seasoned seamstress, you're sure to find a tip that will make sewing a little easier! In celebration of National Sewing Month, here are those tips, part two....
a.)If you have little kids or just don't want to find straight pins with your own feet: the best thing to have is a magnetic pin box. They're not as flashy as some pin cushions but should you drop a pin, especially on carpet where it becomes super hard to find, you simply take the box and drag it over the general vicinity-locates the pin every time. b.) Professional tailoring results come from pressing not ironing. People often think pressing is simply ironing as if you're getting wrinkles out. True pressing is actually applying heated weight with your iron to a garment and/or seam to set it or achieve a certain effect. Therefore its best to have a heavier iron,(the best are the vintage metal ones) and the appropriate pressing/tailoring tools such as hams etc. Many pattern companies have patterns to make the tailoring tools yourself. These are great for not only traditionally tailored pieces but practically every kind of garment that might be made.
c.) when pressing velvet or some other napped fabric where you want to preserve the pile, its great if you have a needleboard but a cheap alternative that will work in a pinch is to use a piece of loose velvet in the place of a needleboard: simply place the piled side of the garment onto the piled side of the velvet piece and press. Popondo
Iron freezer paper to your pattern pieces. They will hold up much longer. Use aluminum foil to keep your ironing board clean.i.e. place aluminum foil on ironing board, then pattern piece (right side down), then freezer paper (wax side down), press. Let cool before cutting around pattern piece. I rough cut pattern pieces before doing this, then precision cut after freezer paper and pattern are bonded together.
I do this even for patterns I've drafted myself on heavier paper. Makes them very durable. DeckedOutDickeys
Measure twice, cut once, is a good one that some one else posted. So many good tips. Freezer paper and parchment paper are good for making and tracing patterns and cheap too. Regular chalkboard chalk is good for marking on dark fabrics and doesn't stain when brushed off... my greatgrandmother used it all the time. Keep your sewing machine clean, change needles often. Just as one can never have enough fabric, one can never have enough pins, needles and safety pins. Don't sew when you're drunk... Always have your needle DOWN when pivoting around curves. A sidewinder bobbin winder is always handy. Know what kind of fabric you are working with, so when you press the fabric, you can set your iron one notch below what it says so you don't scorch it. Waxed dental floss works well for gathering some fabrics. Keep your most used sewing tools in a toolbox where you sew most often. Read all patterns and pattern instructions before you start. Don't sew your fingers together. Keep scraps near the sewing machine to test new stitches, tension, and for possible excess oil after cleaning the sewing machine. Keep the lint brush or some soft paintbrushes near your sewing machines to keep it tidy. Cotton threads make a lot of lint. Always check to make sure you threaded the machine properly and loaded the bobbin properly. Hold on to the owners manual of the sewing machine and know the manufacturers website in case you need to download a replacement for the make and model of your machine. Sewing machine repair places often have loaner models to keep you going while your machine is being serviced and they offer classes and if you service your machine yourself, they have parts. When trying out a new pattern, get twice as much fabric as it calls for, so you can make two attempts at it. berrybluecreations
ALWAYS pre-wash any fabric that contains cotton & serge/overlock, or zig-zag the cut edges before tossing it in the wash to reduce fraying. The finished product will look much nicer if you press your seams as you are constructing it. This is especially true for clothing, everything just lays nicer.
Have a super wrinkled pattern piece? Iron it! Put your iron on medium heat (NO STEAM!) and lightly run it over your crinkled paper pattern.
Did you know you're a walking yard stick? The distance from your hand with your arm stretched straight out from your shoulder to your nose is roughly one yard on the average. Fold fabric with the selvege edges together, and hold the end in the hand extended from your shoulder, loosely grip the fabric in your other hand and gently pull the fabric to your nose: one yard! Its a great quick way to get an approximate measurement of your fabric.
Hydrogen peroxide will take blood out of any fabric without altering the fabric's color.
Keep a can of compressed air (like what you use to clean out your keyboard)handy to quickly clean your your sewing machine or serger.
When sewing magic dot (the stretchy fabric with sequins glued to it), use vegetable oil to lubricate your needle every few inches to keep it from gunking up.
Never use the steam setting on your iron when fusing interfacing, fusible fleece, wonder-under, or any other iron-on product.
When ironing red, purple, or blue satin, use a pressing cloth. The heat will temporarily change the color of the fabric, but sometimes it can last a pretty long time. FrayedFuzzies
***NOTE*** Because machines differ, always check the manufacturer's instructions for proper cleaning procedures!
Always stay-stitch! Even though it takes a little longer, it will make the finished product much smoother across curves and necklines. This is something my mom drilled into my head when she first began teaching me how to sew. StandingSun
You can use a fine bead of Elmer's White School Glue (the washable kind) to hold/secure tricky areas together. Set the glue with by pressing over the area. This will keep the fabric from shifting as you sew it in place. Set the glue by pressing over the area with a hot iron. momomadeit
hmmm... I dunno if this is standard or not, but I trace all my patterns onto sturdy white paper, which makes it easy to just lay on the fabric and chalk around.Also, I have a Singer 201-2 which runs quite fast, so to get light pressure and slower sewing, I always sew in my bare feet. ananemone
For sewing on knits, I like using the "walking foot". aromafields
hocky pucks. I use them for fabric weights instead of the expensive ones or pins. My son collected them in the skating rinks while my daughter skated. Just clean them up, put some furniture polish on them and you are ready to go! HowardAvenue
Never buy fabric unless you can think of something specific for it. Fabric that is just so cute (or cheap or whatever) that you're sure you'll think of something just sits there. Mylittle
Stick one side of a piece of sticky-backed velcro to the side of your sewing machine and the other side to your seam ripper. So long as you stick the seam ripper to the machine point down, you don't have to worry about getting jabbed and your seam ripper is always easy to find. I'm forever losing mine, so this tip has saved me a LOT of time! lauriescustomcreate
These are awesome tips. Been sewing for 30 yrs. gave it up for 10, just started again. my machine is almost 30 years now and still kicking strong.I was 5 yrs old when I received my first sewing machine and my mom a profesionnal seamstress taught me so much but I am still learning and I love it. Looking forward for a guide that has all those wonderful tips. Some I already do, some that I found were fantastic ideas. I don't really have any, but one I can think of: I use newspaper when making patterns. They don't tear up, iron easy and last. chantalmarieliving
I really enjoyed putting this post together. There was much positive feedback and encouragement and I appreciate all the comments in the thread and through convos. I might have to do this again next year!

Tuesday, September 28, 2010
Monday, September 27, 2010
Sewing Tips From Those Who Know ~ Part One
A few days ago, I asked in the Etsy forums for the best sewing tips from those who sew. The response was tremendous!! Whether you are a beginner or a seasoned seamstress, you're sure to find a tip that will make sewing a little easier! In celebration of National Sewing Month, here are those tips...
Understitching facings to seam allowances will make them lay flatter around neck and armhole openings. Topstitching is neater and easier with understitching. TexstyleTextures
If you are making the same basic design pieces in multiples, make your steps count. Cut all of the pieces needed for all of the stuff you're working on all at once.
Press all the pieces all at once.
Make all handles and pockets all at the same time; one after the other.
Do all basic assembly the same way.
Install zippers and hardware for all the finished pieces at the same time.
Assemble everything all in one go.
Make sure you have plenty of preloaded bobbins on hand. I wind 2 dozen bobbins at a go, all in basic tan (it goes with everything) so I don't run out. When I'm on a roll, I can make about 36 finished and lined bags with pockets and hand-sewn button closures in one day. The trick is to have everything ready to go at your fingertips and not have to get up from the machine every two minutes. Her Royal Majesty Bags
If you have a fabric and you can't easily tell the wrong side from the right side. Just get out the chalk and put a big X on the wrong side. (Or you could pin a safety pin to the wrong side, but, that chalk X really stands out) Rip it rip it rip it Sley The Dent
Many Fabrics are best pre-washed...Iron as you go
"She who dies with the most Fabric....WINS!" When you return from buying Fabric..leave it in the Trunk of your car until it is dark LOL Anica's Cottage
Press your stuff. Press it before you cut, and then press any hems into it before you sew! It makes everything so much easier and neater in the end. beanjbunny beanjbunny's blog
measure twice, cut once! janeeroberti
Cotton fabric users: save your selvages! TheQuiltingViolinist
A seasoned seamstress taught me to rip the fabric instead of cutting it to find the grain of the fabric. (This only works for light-weight cottons or poly/cot blends). Oh - and I always label my fabric the minute I get it home. Since I have hundreds of pieces, I use a label on the corner of one end and put the amount of yardage. Many times I buy 1 yard, 1/2 yard, etc. and this helps me later to see if I have enough for a project without having to re-measure. (I also include date & purchase price, but that's because I can then tell what I paid and it helps me with costing later on) happygolucky1
When gathering large amounts of fabric (as for a bed skirt) instead of using basting stitches to pull the gathers, zig-zag stitch over a thin piece of twine (cooking twine works well) keeping the stitches free of the string. When done stitching, just pull your twine to make the gathers...easy smeasy with no more thread breakage! :) MyMotherMary
I use pedicure toe spacers to store my bobbins in. ButterflyandLadybug
If you draft or alter your own patterns, stock up on white diaper flannel. It's super cheap, infinately better than traditional non-woven pattern paper. The best part is that it "sticks" to your actual fabric, so there is really no need to pin the pattern. I block my patterns on the flannel and then roll the pieces up together for each size with a rubber band marked with the style and size. They store well, don't wrinkle and last FOREVER. lillipopsdesigns
I'm a new sewer, but agree that pre-washing and drying is best. I run a quick zig-zag along the cut ends to keep the fraying down. Also, if the fabric is for a specific pattern I don't think I will get to for a while, I will either tuck the pattern into the fabric or pin the pattern number onto the fabric. LibertyImages
If you use a hand cranked machine, do not put your pin pot where your elbow will knock it to the floor on the first turn of the wheel... Overspill
I love to sew. My tips are not to drink too much wine when sewing and to sew when the kittens nap. :) Also, nonfusible interfacing makes great material for tracing patterns rather than pattern paper - much more durable! TheVintageDesignShop
I save cardboard(non- corrugated) from cereal boxes, etc. and make durable, re-usable patterns that cost $000! LeatherheadOriginals
Aren't these some great tips so far? I'll have even more tomorrow!
Sunday, September 26, 2010

Thursday, September 23, 2010
My New Love
Making lavender sachets has been fun and satisfying from the beginning. It's one of those things that is quick to make from start to finish, so you see a finished product in no time at all. When I first started, it would take some time to pick out the right fabric to go with the vintage hankie and then figure out which part of the hankie fit best. Then there was the measuring and making sure corners were pointed and centered and everything had to be perfect. I didn't mind doing any of this.
When I decided to donate two sachets for a fundraiser, I wanted them to be different from what I had always made. I looked at the fabric stash and chose two colors of scrap fabric. Next, I looked at my stash of everything else and just started pulling out things like lace, buttons, ribbons and beads and just started layering everything together. It didn't matter anymore if it wasn't perfect. In fact, the more imperfect it was, the more perfect it became! It was like someone told me I could color outside the lines and it would be okay! I have truly loved this new process of creating! It's okay if no one likes them....I have discovered something inside of me that I didn't know was there and THAT is exciting and inspiring!
These two sachets are my newest creations and are in my Etsy shop, So Many Memories.


I have always believed that I wasn't creative. That I needed a pattern and instructions, and I couldn't come up with an original idea. For once, I don't mind being proven wrong!
Wednesday, September 22, 2010
The Mayonnaise Jar and the Coffee
I first came across this story on Trudy's blog, Sewing With Trudy. It made me stop and think about the choices I make each day and what my priorities are.
.
The Mayonnaise Jar and the Coffee
When things in your life seem almost too much to handle, when 24 hours in a day are not enough, remember the mayonnaise jar... and the coffee...
A professor stood before his philosophy class and had some items in front of him. When the class began, wordlessly, he picked up a very large and empty mayonnaise jar and proceeded to fill it with golf balls.
He then asked the students if the jar was full. They agreed that it was.
The professor then picked up a box of pebbles and poured them into the jar. He shook the jar lightly. The pebbles rolled into the open areas between the golf balls. He then asked the students again if the jar was full. They agreed it was.
The professor next picked up a box of sand and poured it into the jar. Of course, the sand filled up everything else. He asked once more if the jar was full. The students responded with a infamous "yes."
The professor then produced two cups of coffee from under the table and poured the entire contents into the jar, effectively filling the empty space between the sand. The students laughed.
"Now," said the professor, as the laughter subsided, "I want you to recognize that this jar represents your life.
The golf balls are the important things. Your family, your children, your faith, your health, your friends, and your favourite passions. Things that if everything else was lost and only they remained, your life would still be full.
The pebbles are the other things that matter. Your job, your house, and your car.
The sand is everything else. The small stuff.
"If you put the sand into the jar first," he continued, "there is no room for the pebbles or the golf balls.
The same goes for life.
If you spend all your time and energy on the small stuff, you will never have room for the things that are important to you.
Pay attention to the things that are critical to your happiness.
Play with your children. Take time to get medical checkups. Take your partner out to dinner. Play another 18.
There will always be time to clean the house and fix the disposal. Take care of the golf balls first, the things that really matter. Set your priorities. The rest is just sand."
One of the students raised her hand and inquired what the coffee represented. The professor smiled. "I'm glad you asked. It just goes to show you that no matter how full your life may seem, there's always room for a couple of cups of coffee with a friend."
I hope you have a wonderful Wednesday!!!
Monday, September 20, 2010
Artfest '10 at Annmarie Gardens

This past Saturday was a glorious September day. It was warm but not hot and humid, just breezy enough to be comfortable, abundant sunshine and the bluest of blue skies! It was a perfect day to spend at a craft show at Annmarie Garden, a thirty acre sculpture park and arts center that is part of the Smithsonian Institute. We are an hour away from DC but this fabulous art center is only 15 minutes away! The booths were set up around the circle and oysterman's water sculpture but also lined the path through the woods. Walking through the woods was my favorite part. The sculptures were nestled in the trees and some in clearings. The benches along the path were themselves works of art. Along one of the paths was square after square of bright, colorful artwork.


We bought a couple of things that I will show you in another post!!! What did you do this weekend?
Friday, September 17, 2010
More From The Sewing Room
I told you I had some more goodies to show you and here they are. First is a set of four coffee themed reversible placemats. I love the colors in these. I think it would make waking up with a cup of coffee in the morning a joy! And of course the cookies would be good too!


Next is napkins. This is something new I tried. I wanted to learn how to do mitered corners and thought this would be a good project to start with. I think I had the hang of it after sixteen corners! This is just one technique and I'm anxious to try another one on placemats.


Both of these items are in my Etsy shop and the napkins have been featured in this treasury! A big thank you to wickedpen for including me!
I have some new ideas for the placemats and I've been busy working on other projects too. I'm on a roll and I love it!!
I hope y'all have a wonderful weekend!
Wednesday, September 15, 2010
I've Been In The Sewing Room
I have been busy lately and actually have something to show for it! My blog friend, Alyssa, from Alygatr's Everywhere, sent out a request for handmade items for a fund raiser her husband's company is having. I was so happy to make a donation and I'm really excited to show you what I made!
First is a set of two reversible placemats with a fall theme. I figured the fall leaves and colors would appeal to more people than everyday designs.


First is a set of two reversible placemats with a fall theme. I figured the fall leaves and colors would appeal to more people than everyday designs.


Next is a lavender sachet made from some scrap fabric, a piece of vintage lace, decorative stitching and little pearl seed beads.


And last is another lavender sachet that I so enjoyed making. For a long time I have loved the layered, torn and tattered look and have been thinking of ways to use it with the things I make. I chose another piece of scrap fabric, vintage lace and buttons, embroidered a piece of gauze like fabric and stitched it all together. It came out like this


I've made some other goodies too, but I'll save them for another post!
What have you been working on?
Monday, September 13, 2010
A Perfect Weekend
Have you ever had one of those weekends where you were totally relaxed and stress free AND at home? It's rare that I feel that way without going somewhere to get away from it all, but this weekend was one of those rare ocassions for me.
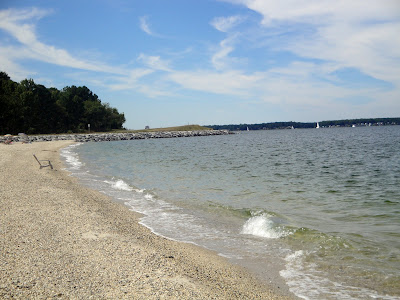
Sean and Erin (our son and daughter) and Shylee came down on Saturday to celebrate Michael's birthday. We packed a picnic lunch and headed for the Patuxent River to spend the afternoon. It was 78 degrees, breezy and low humidity. In other words...perfect! And there were no crowds to get in the way!
We ate, played on the playground (Michael got some quality grandpa time), walked on the beach and enjoyed each others company!
Sunday was another perfect day because I spent it in the sewing room creating and learning how to miter corners!


Sneak peek of things to come


Sunday, September 12, 2010

Subscribe to:
Posts (Atom)